Thursday, 10 October 2013

Properties of tools...........


                               Right side of the Design environment we the PROPERTY BOX for everything like form, labels, textboxes, buttons etc.. in the design area. If it does not appears jst goto
VIEW menu ---> other windows ---> then select Properties window.


If your Properties box says "Textbox1 Textbox" or "Label1 Label" then you haven't yet selected the Form. Click away from the textbox or label until the Properties box reads "Form1 Form".

The property box has different properties such as: font , background image, background image layout, cursor etc..

If we want to change the name of the FORM jst put the cursor on the form goto properties and the select "AZ grid" which is nothing but alphabet grid on the top of the property box.

 Then goto TEXT by scrolling down to the property box.

Then change the name FORM1 by new name like "My New Form".
IT looks like:

Before changing :

After changing:


<---- Previous page                                                         Next page ---->


VB.NET HOME PAGE

Wednesday, 9 October 2013

Adding Controls To Form Using Tool box

Adding controls to form:
      We can add controls or tools to our form such as labels, text boxes, buttons and so on...


how to add labels to a form?

1. First open tool box and select label then move to form then drag and drop the mouse with left click.
2. Then we add the label to the form.
3. In this way we can add more labels as per our requirement.
How to add text box to a form?

1. First open tool box and select TextBox then move to form then drag and drop the mouse with left click.
2. Then we add the TextBox to the form.
3. In this way we can add more TextBoxes as per our requirement.


         In this manner we can add other controls too..
         we will observe them in later sections...

How to add Button to a form?

1. First open tool box and select BUTTON then move to form then drag and drop the mouse with left click.
2. Then we add the BUTTON to the form.
3. In this way we can add more BUTTONS as per our requirement.

                                                        (or)

Just double click on any control . It will directly placed on the form Top-Left corner.
We can place it wherever we want.


<---- Previous page                                               Next page ---->


VB.NET HOME PAGE

Tuesday, 8 October 2013

How to access Visual basic Express 2010New Project

New Project:


how to take a new project in visual basic?

1. Goto start---> open Microsoft Visual Basic Express 2010
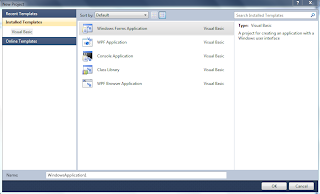
2. click on new project.
     Its looks like

3. Then click on Windows Forms Application. Then click ok


It displays a new form. working area.

4.Beside form on the lift side we have tool box to use different tools for form creation.
5.If not appeared goto Menu bar ----> Click on VIEW menu ----> goto other windows ----> select Tool box.
                                                                     (or)
jst click Ctrl+Alt+x.


6. To run the  form goto Debug menu----> click on start  debugging.
 It runs our form..


        <---- Previous page                                               Next page ---->


VB.NET HOME PAGE

VB.NET basics

       VB.Net is a simple, modern, object-oriented computer programming language developed by Microsoft to combine the power of .NET Framework and the common language runtime with the productivity benefits that are the hallmark of Visual Basic.

The .Net Framework
The .Net framework is a revolutionary platform that helps you to write the following types of applications:

  •          Windows applications
  •          Web applications
  •          Web services

Integrated Development Environment (IDE) For VB.Net


Microsoft provides the following development tools for VB.Net programming:

After installing the visual Basic Express 2010 software it looks like:


   <----Previous page                        Next page  ---->


VB.NET HOME PAGE


Thursday, 13 June 2013

Multi touch Technology

MULTI TOUCH TECHNOLOGY

ABSTRACT

            When interacting with a regular desktop computer, indirect devices such as a mouse or keyboard are used to control the computer. Results of the interaction are displayed on a monitor. Current operating systems are restricted to one pointing device. With the introduction of multi-touch, a new form of human computer interaction is introduced. Multi-touch combines display technology with sensors which are capable of tracking multiple points of input. The idea is that this would allow users to interact with the computer in a natural way.

            Multi-touch consists of a touch screen (screen, table, wall, etc.) or touchpad, as well as a software that recognizes multiple simultaneous touch points, as opposed to the standard touch screen which recognizes only one touch point at a time. Multi touch using Frustrated Total Internal Reflection is a simple, inexpensive, and scalable technique for enabling high-resolution multi- touch sensing on rear-projected interactive surfaces. Different  applications for multi-touch interfaces both exist and are being proposed.  Some uses are individualistic eg iPhone, iPod touch, MacBook Pro, MacBook Air. The use of multi-touch technology is expected to rapidly become common place.


PDF Document
WORD Document
PPT Downloads

Tuesday, 11 June 2013

Analog clock

CPP program to display analaog clock:

#include<conio.h>
#include<graphics.h>
#include<dos.h>
#include<process.h>
#include<iostream.h>

int calculatehrs(int h)
{
 int x;
 switch(h)
 {
  case 0: x=90;
   break;
  case 1:
  case 13: x=60;
    break;
  case 2:
  case 14: x=30;
    break;
  case 3:
  case 15: x=0;
    break;
  case 4:
  case 16: x=330;
    break;
  case 5:
  case 17: x=300;
    break;
  case 6:
  case 18: x=270;
    break;
  case 7:
  case 19: x=240;
    break;
  case 8:
  case 20: x=210;
    break;
  case 9:
  case 21: x=180;
    break;
  case 10:
  case 22: x=150;
    break;
  case 11:
  case 23: x=120;
    break;
  case 12:
  case 24: x=90;
   break;
 }
 return(x);
}

int calculatemin(int m)
{
 int x;
 if(m%5==0)
 {
  switch(m)
  {
   case 0: x=90;
    break;
   case 5: x=60;
    break;
   case 10: x=30;
     break;
   case 15: x=360;
     break;
   case 20: x=330;
     break;
   case 25: x=300;
     break;
   case 30: x=270;
     break;
   case 35: x=240;
     break;
   case 40: x=210;
     break;
   case 45: x=180;
     break;
   case 50: x=150;
     break;
   case 55: x=120;
     break;
   case 60: x=90;
     break;
  }
 }
 else
 {
  if(m>0&&m<15)
  {
   switch(m)
   {
    case 1: x=84;
     break;
    case 2: x=78;
     break;
    case 3: x=72;
     break;
    case 4: x=66;
     break;
    case 6: x=54;
     break;
    case 7: x=48;
     break;
    case 8: x=42;
     break;
    case 9: x=36;
     break;
    case 11: x=24;
      break;
    case 12: x=18;
      break;
    case 13: x=12;
      break;
    case 14: x=6;
      break;
   }
  }

   if(m>15&&m<30)
  {
   switch(m)
   {
    case 16: x=354;
      break;
    case 17: x=348;
      break;
    case 18: x=342;
      break;
    case 19: x=336;
      break;
    case 21: x=324;
      break;
    case 22: x=318;
      break;
    case 23: x=312;
      break;
    case 24: x=306;
      break;
    case 26: x=294;
      break;
    case 27: x=288;
      break;
    case 28: x=282;
      break;
    case 29: x=276;
      break;
   }
  }

   if(m>30&&m<45)
  {
   switch(m)
   {
    case 31: x=264;
      break;
    case 32: x=258;
      break;
    case 33: x=252;
      break;
    case 34: x=246;
      break;
    case 36: x=234;
      break;
    case 37: x=228;
      break;
    case 38: x=222;
      break;
    case 39: x=216;
      break;
    case 41: x=204;
      break;
    case 42: x=198;
      break;
    case 43: x=192;
      break;
    case 44: x=186;
      break;
   }
  }

   if(m>45&&m<60)
  {
   switch(m)
   {
    case 46: x=174;
      break;
    case 47: x=168;
      break;
    case 48: x=162;
      break;
    case 49: x=156;
      break;
    case 51: x=144;
      break;
    case 52: x=138;
      break;
    case 53: x=132;
      break;
    case 54: x=126;
      break;
    case 56: x=114;
      break;
    case 57: x=108;
      break;
    case 58: x=102;
      break;
    case 59: x=96;
      break;

    }
  }

  }
 return(x);
}

int changehrs(int m,int a)
{
 if(m>15&&m<=30)
  a-=12;
 if(m>30&&m<=45)
  a-=18;
 if(m>45&&m<60)
  a-=24;
 return (a);
}

void main()
{
 int gdriver=DETECT,gmode,h,m,s,a,b,c;
 initgraph(&gdriver,&gmode,"c:\\tc\\bgi");

 struct  time t;
 gettime(&t);
 h=t.ti_hour;
 m=t.ti_min;
 s=t.ti_sec;

  a=calculatehrs(h);
 b=calculatemin(m);
 c=calculatemin(s);
 a=changehrs(m,a);

 for(int i=a;i>0;i-=6)
  for(int j=b;j>0;j-=6)
  for(int k=c;k>0;k-=6)
  {
   setbkcolor(7);
   settextstyle(1,HORIZ_DIR,5);
   setcolor(BLUE);
   outtextxy(190,20,"Analog Clock");
   settextstyle(8,HORIZ_DIR,2);

    setcolor(BLUE);
   circle(300,200,102);
   setcolor(YELLOW);
   circle(300,200,100);
   outtextxy(385,185,"3");
   outtextxy(288,98,"12");
   outtextxy(207,185,"9");
   outtextxy(295,270,"6");

    circle(345,123,2);
   circle(378,155,2);
   circle(378,245,2);
   circle(345,280,2);
   circle(253,278,2);
   circle(223,245,2);
   circle(223,155,2);
   circle(253,123,2);

    setcolor(RED);
   pieslice(300,200,i-1,i,75);
   setcolor(WHITE);
   pieslice(300,200,j-1,j,85);

    setcolor(BLUE);
   pieslice(300,200,k-1,k,95);

    setcolor(RED);
   settextstyle(3,HORIZ_DIR,1);
   outtextxy(360,400,"Press any key to exit...!!");
   sleep(1);
   clearviewport();

    if(i==6)
    a=360;
   if(j==6)
    b=360;
   if(k==6)
    c=360;

    if(kbhit())
   {
    setcolor(BLUE);
    setbkcolor(WHITE);
    settextstyle(1,HORIZ_DIR,8);
    outtextxy(130,150,"Thank You");
    sleep(3);
    exit(0);
   }

   }
}


Error:
after save the program we can compile it and we can run it by pressing the keys alt+f9(compile) and ctrl+f9(running) respectively.

while compiling and running it wont give any error.
but it flickers the screen and then terminates it.
when we press the keys alt+f5 it prints the BGI error
to recctify the error we must copy the "EGAVGA.BGI" file from BGI foder into the current folder where we save our program.
steps to goto BGI folder:
start---> my computer---> local disk(C)--->turbo c++--->Disk--->turboc3--->
BGi folder--->EGAVGA.BGI.
again save the program and then compile and run it
then we willl get the analog clock as output.


output:


Thursday, 16 May 2013

How to merge the cells in Spreadsheet?


How to merge the cells in Spreadsheet?

Type the data into the cells..
For example type the data into A1, B1,C1:
Then highlight those cells and then goto the menu HOME and then go to Alignment panel there click on the icon merge and center.
That icon has some more options check them out.
Before merging:


After merging:


Spread Sheet


   Excel worksheet:         

               In this section we are going to learn the purpose of Microsoft Excel software and the purpose of the spreadsheet. Here the spread sheet also called as worksheet.

What is a Spreadsheet?
A spreadsheet is a piece of software for handling and manipulating numbers. You can write numbers down on a piece of paper and add them up. Like this:
23
12
10
45 =
But that's not a spreadsheet. However, if you bought Microsoft Excel and entered the same numbers into the software, you'd have a spreadsheet. The best part about a spreadsheet is - you don't have to do any adding up yourself! The program will add the numbers up for you.
A spreadsheet doesn't only add up, of course. It can do a whole lot more besides simple arithmetic. It can handle financial calculations, statistical information, and do complex trigonometry. And it can make a pretty graph for you.

Tuesday, 19 February 2013

Armstrong number


Write a java script for an ARMSTRONG number using WHILE loop

<html>
<head><TITLE></TITLE>
<script language="JavaScript">
var b,z,c=0;
var a=prompt("Enter a number");
z=a;
while(z>0)
{
b=z%10;
c=c+(b*b*b);
z=parseInt(z/10);
}
if(a==c)
alert("given no is amstrong number");
else
alert("given no is not an amstrong number");
</script>
</head>
<body></body>
</html>

palindrome


Write a program for PALINDROME  using DO-WHILE loop

<html>
<script language="javascript">
var a;
var b=0;
var temp;
a=parseInt(prompt("enter a no."));
temp=a;
do
{
b=b*10;
b=b+parseInt(a%10);
a=parseInt(a/10);
}while(a>0);
document.write(b)
if(temp==b)
{
 document.write("the given no is palindrome");
}
else
{
 document.write("the given no is not a palindrome");
}
</script>
</html>

output

enter a no:
1221
the given no is palindrome

enter a no:
1251
the given no is not a palindrome